How to boost WordPress Performance with Redis.
In today’s fast-paced digital world, website performance is crucial. Slow loading times can lead to a poor user experience and even impact your search engine rankings. Thankfully, there are powerful caching solutions available to speed up your WordPress site. One such solution is Redis Object Cache, a plugin that leverages the speed and efficiency of Redis, an in-memory data store. In this article, we’ll guide you through the process of setting up Redis Object Cache for your WordPress site, unlocking its full potential.
Of course, we assume that a working Redis server is already running on your system and available via a Unix domain socket. If that is not the case, you can follow the steps in this guide.
Since we are going to use WP-CLI to install and configure the Redis Object Cache plugin, this tool must also be available on your system. If you don’t already have WP-CLI installed on your system, you can follow this guide.
To avoid having to specify the document root path every time you run WP-CLI commands, simply go to the document root of your domain and run these commands from there.
If you followed our previous guide for setting up Nginx to host multiple domains, you will find the “document root” in “/var/www/virtual/<your-domain.com>/htdocs/”. This may be different on your server, so adjust if necessary.
cd /var/www/virtual/<your-domain.com>/htdocs/
There are several plugins you can use with WordPress to optimize Redis functionality and automatically flush the cache after changes, but in our opinion, the free version of “Redis Object Cache” by Till Krüss is by far the best.
Installing this plugin with WP-CLI is easy with the following command:
sudo -u www-data wp plugin install redis-cache --activate
If you get “Warning: Failed to create directory ‘/var/www/.wp-cli/cache/’: mkdir(): Permission denied.” when you run the above command you need to change the owner and group of the “/var/www” directory to the user “www-data” to get full permissions.
chown www-data. /var/www/
We also use WP-CLI to make the necessary changes/additions to “wp-config.php” needed for the plugin to work properly.
sudo -u www-data wp config set WP_REDIS_CLIENT phpredis &&\
sudo -u www-data wp config set WP_REDIS_SCHEME unix &&\
sudo -u www-data wp config set WP_REDIS_PATH /var/run/redis/redis.sock
By default, Redis Object Cache uses the WordPress database table prefix defined in wp-config.php for its own key prefix in the Redis cache. If you have multiple WordPress sites that use the same MySQL table prefix (default “wp_”), the content of the sites may get mixed up in the Redis cache and cause problems with site rendering.
Despite the recommendation to replace the default MySQL prefix “wp_,” this is not done in most new WordPress installations or if it is, the same modified prefix is used for every other WordPress site on the same server. It is therefore necessary to define a unique key in “wp-config.php” that Redis can use to create a separate bucket for each site to store the data in.
This unique key can be defined with “WP_REDIS_PREFIX” (or the old format WP_CACHE_KEY_SALT) added to “wp-config.php”. Basically, it does not matter how the key is written as long as it is unique, and often the choice here is just to specify the domain name of the site.
sudo -u www-data wp config set WP_REDIS_PREFIX example.com
Although your “WP_REDIS_PREFIX” is a good solution to let Redis distinguish between the different domains hosted on the server, it is even better to use “WP_REDIS_DATABASE” which assigns a separate database for each website. However, the number of databases Redis can allocate is limited to 16 (0-15), so this option can only be used if no more than 16 websites are using the same Redis server.
With the following command we can determine which database numbers have already been used.
grep -r "WP_REDIS_DATABASE" /var/www/virtual/*/htdocs/wp-config.php
The output should look something like this:
/var/www/virtual/example.eu/htdocs/wp-config.php:define( 'WP_REDIS_DATABASE', '3' );
/var/www/virtual/example.biz/htdocs/wp-config.php:define( 'WP_REDIS_DATABASE', '2' );
/var/www/virtual/example.org/htdocs/wp-config.php:define( 'WP_REDIS_DATABASE', '1' );
/var/www/virtual/example.net/htdocs/wp-config.php:define( 'WP_REDIS_DATABASE', '0' );
In this example, the numbers 0,1,2 and 3 have already been applied and thus can no longer be used to configure the current domain. In principle, it does not matter which number you use first as long as it has not been used before and between 0 and 15. However, for consistency, we take the number that follows the last number used, so in this case 4.
sudo -u www-data wp config set WP_REDIS_DATABASE 4
Having completed the configuration, we can now enable Redis.
sudo -u www-data wp redis enable
Check the status to make sure everything is working correctly.
sudo -u www-data wp redis status
If all went well, you now get a list of parameters with the line at the top “Status: Connected.”
Status: Connected
Client: PhpRedis (v5.3.7)
Drop-in: Valid
Disabled: No
Ping: 1
Errors: []
PhpRedis: 5.3.7
Relay: Not loaded
Predis: Not loaded
Credis: Not loaded
PHP Version: 8.2.6
Plugin Version: 2.4.1
Redis Version: 7.0.11
Multisite: No
Metrics: Enabled
Metrics recorded: 41
Filesystem: Working
Global Prefix: "dbprfx_"
Blog Prefix: "dbprfx_"
WP_REDIS_CLIENT: "phpredis"
WP_REDIS_SCHEME: "unix"
WP_REDIS_PATH: "/var/run/redis/redis.sock"
WP_REDIS_DATABASE: "4"
WP_REDIS_PLUGIN_PATH: "/var/www/virtual/example.com/htdocs/wp-content/plugins/redis-cache"
........
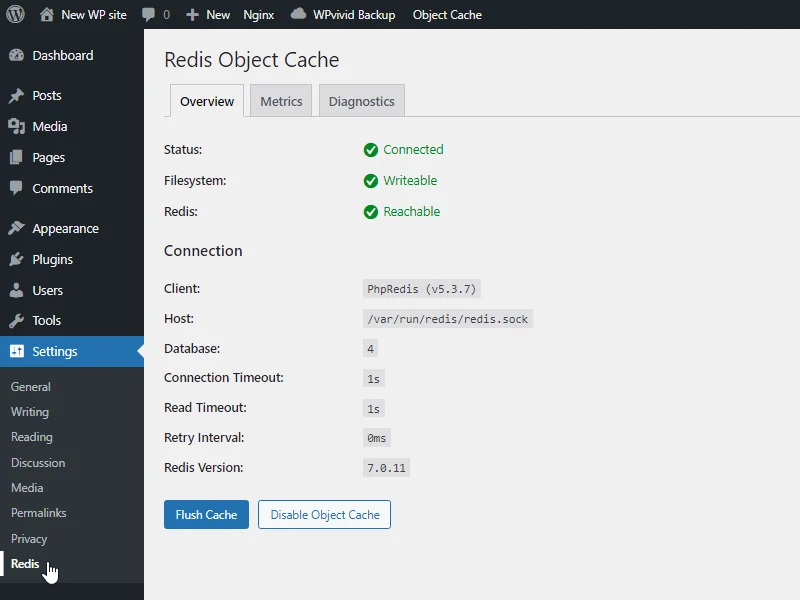
Now if you go to WP’s admin panel, you will find a new “Redis” tab under “Settings”. If you click on that, you will get a page with an overview and status of the “Redis Object Cache” with several additional tabs for “Metrics” and “Diagnostics” as you can see in the image below.
To verify if the Redis Object Cache is working correctly, you can use the following command which will show you the Redis server activity in real time:
sudo -u www-data redis-cli -s /var/run/redis/redis.sock monitor
Now if you visit your WordPress site and navigate through the various pages, you should see cache-related activity, indicating that Redis is being used as an object cache.
To display the statistics of the individual databases with the number of keys and the number of keys with expiration dates, you can run the following command:
sudo -u www-data redis-cli -s /var/run/redis/redis.sock info keyspace
This should give you the following similar result:
# Keyspace
db0:keys=240,expires=1,avg_ttl=6149400
db1:keys=849,expires=10,avg_ttl=718177800
db2:keys=78,expires=1,avg_ttl=444298250
db3:keys=432,expires=12,avg_ttl=925429900
db4:keys=88,expires=2,avg_ttl=457939000